
Note!!!!!
1) We are making a right over left placket for boys wear, gals traditionally button left over right.
Just do these in the opposite order if sewing for a girl.
2) If you are working with thin fabric, now is the time to iron on some fusible interfacing to the button placket pieces.
3) You can choose between making with sleeves and making sleeveless.
If you choose clothes with sleeves, you don’t have to cut arm bias binding.
And if you choose clothes without sleeves, you don’t have to cut sleeves pattern.
1. Long romper

Draw the center line, two lines 1cm(3/8") from center line and diagonally to create a triangle
on the wrong side of the fabric as shown.

Cut in the middle but stop 1cm(3/8") from the end and clip diagonally to create a triangle
as shown.

Fold button placket in half widthwise.
Then open it and fold 1cm(3/8") of side edges to the center, press.
And fold 1cm(3/8") of bottom edge of placket to the wrong side as shown.

To sew the placket, pin the right side of the prepared placket pieces to the wrong side the bodice front, matching the cut line on the placket to the center-front line on the bodice.
For the right placket, sew along the sewing line but stop 1cm(3/8") from the bottom edge.

Working on the inside right of the garment, fold the placket to the inside, hiding two of the 1cm(3/8") flaps and triangle shape inside. The goal is to hide all raw edges. Play around with this step until it lays nice and smooth. Pin securely.

For the left placket, fold 1cm(3/8") of bottom edge and sew along the sewing line
over the folded bottom edge as shown.


Starting with the placket piece on your right when facing up in front of you (this will be the left side of the placket when you’re wearing it), push the excess placket flap (and the little triangle at the end of the baste guide) to the inside.


Carefully edge-stitch along the right seam, making sure to catch the folded edge of the placket on the inside of your top. Continue past the baste guide till just before the end of the placket piece. Stop, pivot and stitch diagonally up to the opposite corner of the baste guide.


Realign the placket so that everything is laying nice and flat and pin the placket closed.
Starting where you left off in step 10, stitch a square at the end of your placket.


Make the button holes as shown

1. Serge or zig-zag the top-edges of pocket.
2. Press 1.5cm(5/8)” and stitch the top edge of pocket first.
3. Iron the edges in toward the wrong side of the fabric on each pocket.
The pocket is now ready to topstitch onto your right side of pockets. Align it based on the markings on your pattern.


Pin and sew the shoulders of front and back together with right sides of fabric together.
Serge or zigzag stitch the shoulders together as shown. Press seamstowards the back.

Fold the twice from the bottom edge to the wrong side of sleeves.

Stitch sleeves and armhole together as shown. Serge them together.
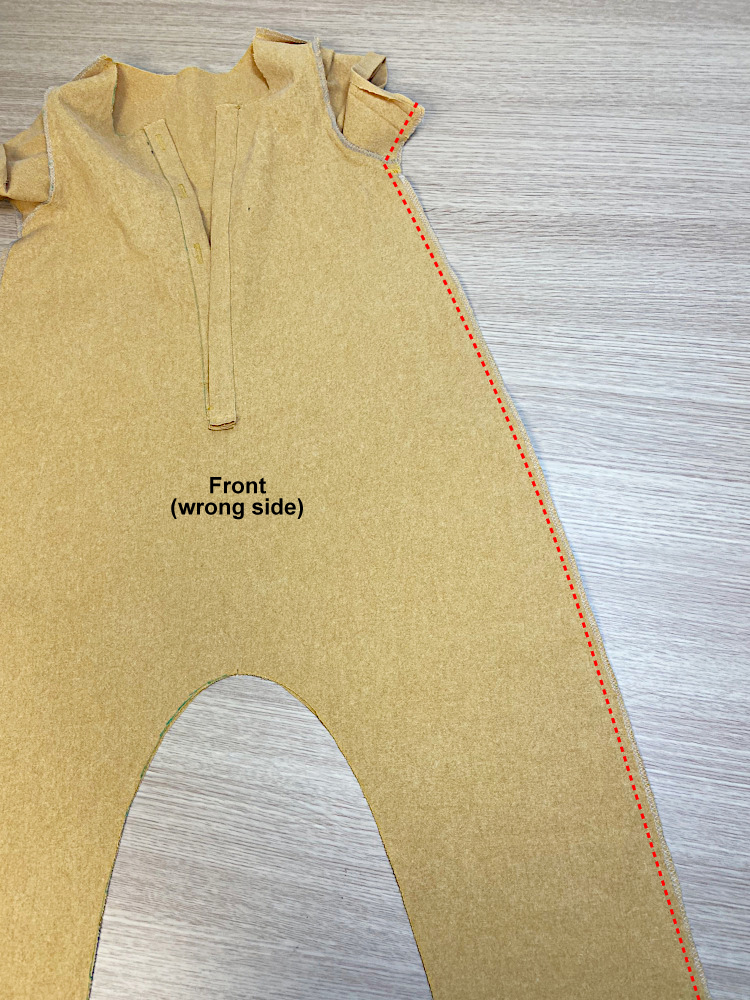
Pin and stitch the front and back together as shown, right sides of fabric together.
Serge or overlock them together.

On the wrong side of sleeve, fold twice concealing the cut edge.
Pin all the way around sleeve hem line and sew.

Fold binding in half lengthwise & press. Then fold seam allowance of the edges & press as shown.

Leave 1cm(3/8") both edge of binding. Working from the right side of the garment, pin and sew binding to garment aligning the raw edges as shown.


Fold the extra 1cm(3/8") binding to the inside of the garments hem.

Press the binding and seam allowances upward, away from the garment. Fold the binding into the garment so that it just covers the seam you just sewed.
Pinning from the outside of the garment, secure the folded edge of the binding by catching it with the pins just below the edge of the binding seam.
Topstitch the binding to the inseam line close to the inside fold.

Hand stitch the buttons as shown.
2. Dress

Sew a parallel row of long (gathering) stitches around the waist line of skirt.
(Stitch length long, tension low/loose)

To gather the skirt fabric simply hold the fabric still in one hand and pull one of the loose threads with the other. Do this on both sides until your skirt is the same width as the each waist.
Repeat with the other piece.

Align the skirt and bodice right sides together.


Draw the center line, two lines 1cm(3/8") from center line and diagonally to create a triangle
on the wrong side of the fabric as shown.
Cut in the middle but stop 1cm(3/8") from the end and clip diagonally to create a triangle
as shown.

Fold button placket in half widthwise.
Then open it and fold 1cm(3/8") of side edges to the center, press.
And fold 1cm(3/8") of bottom edge of placket to the wrong side as shown.

To sew the placket, pin the right side of the prepared placket pieces to the wrong side the bodice front, matching the cut line on the placket to the center-front line on the bodice.
For the right placket, sew along the sewing line but stop 1cm(3/8") from the bottom edge.

For the left placket, fold 1cm(3/8") of bottom edge and sew along the sewing line
over the folded bottom edge as shown.

Starting with the placket piece on your right when facing up in front of you (this will be the left side of the placket when you’re wearing it), push the excess placket flap (and the little triangle at the end of the baste guide) to the inside.
Carefully edge-stitch along the right seam, making sure to catch the folded edge of the placket on the inside of your top. Continue past the baste guide till just before the end of the placket piece. Stop, pivot and stitch diagonally up to the opposite corner of the baste guide.


Realign the placket so that everything is laying nice and flat and pin the placket closed.
Starting where you left off in step 10, stitch a square at the end of your placket.

Sew a parallel row of long (gathering) stitches around the waist line of skirt.
(Stitch length long, tension low/loose)
To gather the skirt fabric simply hold the fabric still in one hand and pull one of the loose threads with the other. Do this on both sides until your skirt is the same width as the each waist.
Repeat with the other piece.

Match the skirt to bodice waist line with right sides together as picture shown.
Align the skirt and bodice right sides together.


Make the button holes on the front as shown

Pin and sew the shoulders of front and back together with right sides of fabric together.
Serge or zigzag stitch the shoulders together as shown.
Press seams towards the back.

Stitch sleeves and armhole together as shown. Serge them together.

Pin and stitch the front and back together as shown, right sides of fabric together.
Serge or overlock them together.
On the wrong side of hem, fold 1cm(3/8") and 1.5cm(5/8") concealing the cut edge and press. Sew the hem of skirt as shown.
On the wrong side of sleeve, fold twice concealing the cut edge.
Pin all the way around sleeve hem line and sew.
댓글
댓글 쓰기