(1) Apply interfacing to the wrong side of back button placket (4cm/1.6” wide).
(2) Fold the 1cm(0.4”) from the raw edge to the wrong side and fold and press 3cm(1.2inch) to the wrong side again. Repeat with the other piece.
(3) Pin and sew the shoulders of front and back together with right sides of fabric together. Serge or zigzag stitch the shoulders together as shown. Press seams towards the front.
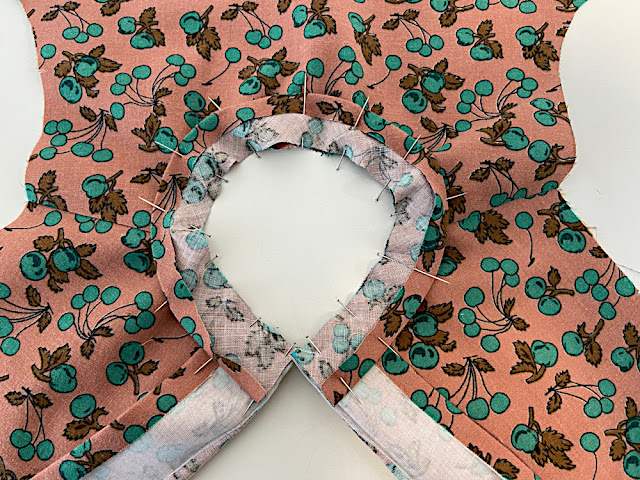
(5) Then fold the 1cm(3/8inch) from the raw edge to the wrong side. Then the fold 3cm(1.2inch) to the to the right side as shown. Then pin them for fixing. Now pin your bias tape to the bodice neckline with right side together. Sew along the neck line as shown.
(6) Trim the points on any sharp angles and cut half of the seam allowance along the curve.
(7) Turn the button placket part inside out. And fold the binding to the inside of the garment, rolling the seam line in slightly to hide it on the inside of the garment. Fold the raw edge of the binding under along the line you pressed earlier, and pin this fold to the inside of the neck line. Continue to press the binding to the other side. Topstitch the binding to the neck line close to the inside fold.
(8) Then edge stitch button placket as shown. Repeat with the other piece.
(9) Make the button holes as shown.
(10) Sew a two parallel row of long(gathering) stitches around the ruffles for sleeves.
(11) To gather the ruffle fabric simply hold the fabric still in one hand and pull one of the loose threads with the other. Do this on both sides until your ruffle is the same width as the bottom edge of sleeve. Repeat with the other piece.
(12) Match the ruffles to the bottom edge of sleeve with right sides together as picture shown.
(13) Using the largest stitch on the sewing machine, run a line of stitching between the front and back armhole notches, You sew your shoulder seams, but not the side seams of your garment. You still put one row of basting stitches in your sleeve head between the markings, but do not sew your underarm seam.
(14)Then you pin and sew in the sleeve as you normally would, adjusting the gathers to ease it in between the markings. The different is, you aren’t messing with the small circular shape that you have when you sew the sides seam and underarm seam first, making it so much easier.
Using your CB (center back line) as a guide, lay your left piece overlapping the right piece and pin in place. Sew the baste stitch.
(15) Once your sleeve is sewn, gathering stitches removed and seam is pressed toward sleeve, you can sew up the side seam and underarm seam in one fell swoop.
(16) On the wrong side of skirt, fold twice concealing the cut edge and press. Sew the hem as shown.
(18) To gather the skirt fabric simply hold the fabric still in one hand and pull one of the loose threads with the other. Do this on both sides until your skirt is the same width as the waist. Repeat with the other piece.
(19) Face the right sides of skirt together.Pin on and stitch along the side lines.
Serge or zigzag red line at the edge as shown. Press seams towards back
(20) On the wrong side of skirt, fold twice concealing the cut edge and press. Sew the hem as shown.
(21) Match the skirt to bodice waist line with right sides together as picture shown.
(20) On the wrong side of skirt, fold twice concealing the cut edge and press. Sew the hem as shown.
(21) Match the skirt to bodice waist line with right sides together as picture shown.
(22) Align the skirt and bodice right sides together. Pin all the way around waist line and sew as shown. Serge or do zigzag the raw edge.


댓글
댓글 쓰기