Cutting the fabrics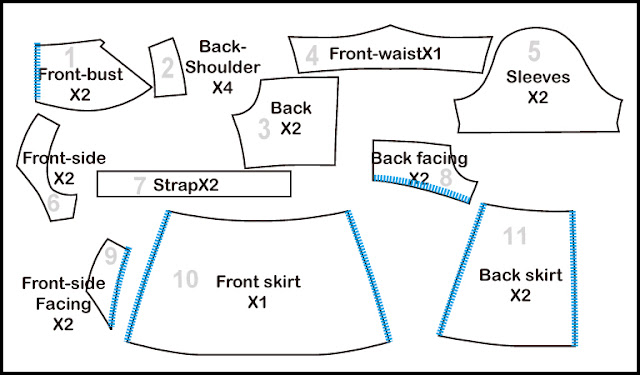 Pin the patterns to the fabric and cut along the solid lines.Check that you have all pieces.1.Front bustX2, 2.Back shoulderX4, 3.BackX2, 4.Front waistX1, 5.SleevesX2, 6.Front sideX2, 7.StrapX2, 8.Back facingX2,9.Front side facingX2, 10.Front skirtX1, 11.Back skirtX2
 1. Press the straps with the wrong sides together So the raw edges meet in the middle.Press side edge 3/8”(1cm) in vertically to the wrong side. Press it again in half horizontally. Give the top stitching.
 2. Face the right sides of front-bust together.Pin on and stitch along the center lines. Stop stitching until slit starts.Make a small horizontal cut into the seam allowance. Make you sure you don’t clip through the stitch line.
 3. Following the line of the center seam, press the two flaps of the slit open towardthe wrong side of your garment. Fold the raw edges of the two flaps in towards thewrong side. Press and pin. Starting at the hem, topstitch the folded edges in place.
 4. Fold top edge of Front-bust 1cm(3/8”) twice into the wrong side as shown. topstitch the folded edges in place.These are will be tunnel for straps.
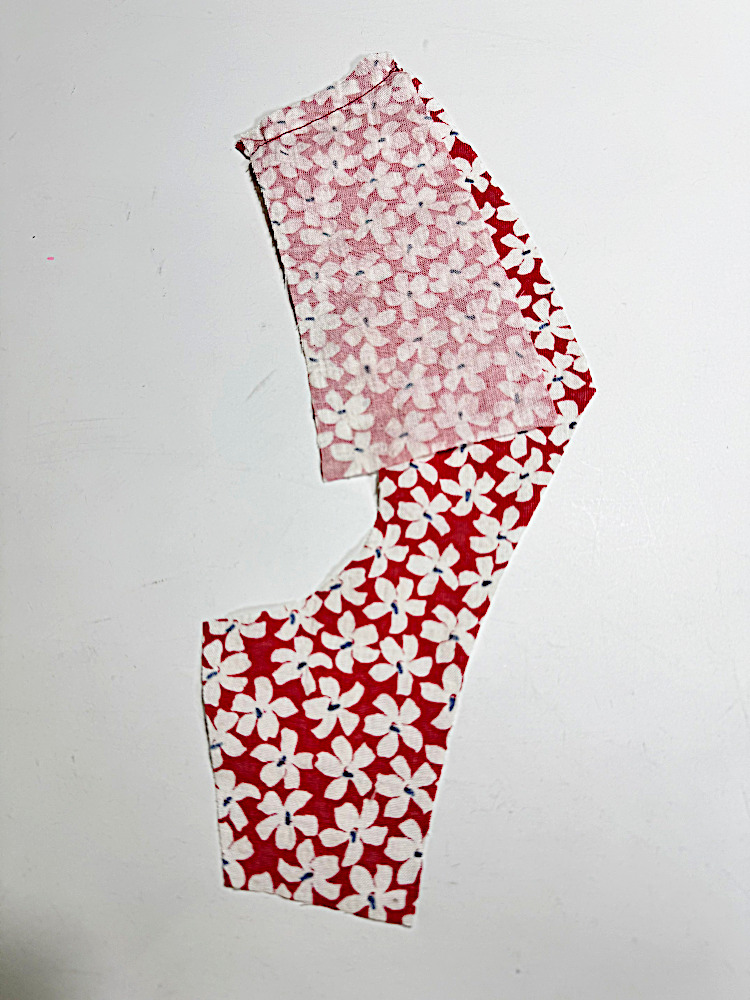
 5. Insert straps through each tunnels and give little stitching at the each side of Front-bust for fixing as shown
 6. Match Back shoulder and Front-side pieces up at the shoulder seams, pin together and stitch them.Press seams open.
 Repeat with Back shoulder and Front side facing pieces.
 Press seams open.
 Press seams open.
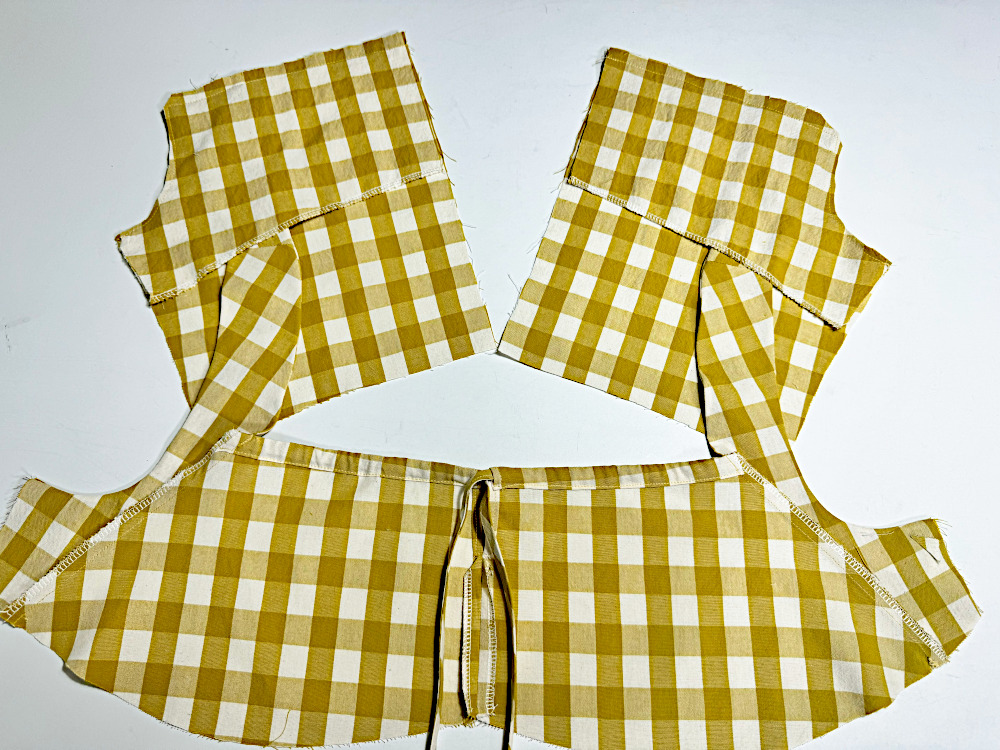
 7. Match Back shoulder & Front-side and Back shoulder & Front side facing pieces up at the Blue line seams as shown,pin together and stitch them as shown.
 8. Turn them inside out and press them as shown.
 9. Match Front bust(step 5) and Back shoulder & Front-side and Back shoulder & Front side facing pieces(step 8) up at the Blue line seams as shown,pin together and stitch them as shown.

 Press seams toward side.
 10. Lay the Back shoulder over the Back as shown.Lay your remaining Back facing piece over the pieces right sides together, sandwiching the Back shoulder inside.Then pin the facing to the Back, with right sides together. Sew them together along the top edge linewith a nice curve as shown. Cut out the edges to only a few mm as shown.


 Turn it inside out.


 Sew a two parallel row of long(gathering) stitches along the bottom line of Front-bust.
 11. To gather the Front-bust fabric simply hold the fabric still in one hand and pull one of the loose threads with the other.Do this on both sides until your Front bust is the same width as the each Front waist.
 12. Then pin the Front-bust to the Front waist, with right sides together. Sew them together along the Front bust lineand front line with a nice curve as shown.
 Align the skirt and Front bodice right sides together. Pin all the way around waist line and sew as shown.Serge or do zigzag the raw edge.
 13. Align the skirt and Back bodice right sides together. Pin all the way around waist line and sew as shown.Serge or do zigzag the raw edge.
 14. Face the right sides of back pieces together. Pin on and stitch along the center line. Stop stitching until zipper starts.
  Face the right sides of front and back together. Pin on and stitch along the side lines
 Midi length dress15-1. Following the line of the center seam, press the two flaps of the slit open toward the wrong side of your garment.Fold the raw edges of the two flaps in towards the wrong side.Press and pin. Starting at the hem, topstitch the folded edges in place.
 Mini length dress15-2. On the wrong side of hem, fold 1cm(3/8") twice concealing the cut edge and press.Sew the hem of skirt as shown
 16. On the wrong side of sleeves, fold twice concealing the cut edge and press.Sew the hem of sleeve as shown.
 17. Sew a parallel row of long(gathering) stitches around the top sleeve.(Stitch length long, tension low/loose)Gathering the top sleeve.18. (1) Mark elastic placement line on inside of garment piece. Place elastic band 2,5cm(1”) from bottom edge of sleeves.(2) Place no cut elastic over marked line on wrong side of fabric.(3) Stitch over elastic. Stretch elastic while stitching.When you reach the mark, simply continue stitching over elastic
 19. Pin and stitch the sleeves together as shown, right sides of fabric together. Serge or overlock them together.
 20. Now match the sleeves to the bodice with right sides together.Stitch the sleeves to the bodice with right sides together. And serge (or zig-zag) seams together.
 6-1. Match Back shoulder and Front-side pieces up at the shoulder seams, pin together and stitch them.Press seams open. Repeat with the other pieces.
 7-1. Match Back shoulder and Front-side pieces up at the Blue line seams as shown, pin together and stitch them as shown.8-1. Turn them inside out and press them as shown.
 9-1. Match Front bust(step 5) and Back shoulder &Front-side and Back shoulder pieces (step 8-1) up at thered line seams as shown,pin together and stitch them as shown.Press seams toward side.


 10-1. Lay the Back shoulder over the Back as shown. Lay your remaining Back facing piece overthe pieces right sides together, sandwiching the Back shoulder inside.Then pin the facing to the Back, with right sides together. Sew them together along the top edge linewith a nice curve as shown. Cut out the edges to only a few mm as shown. Turn it inside out.Sew a two parallel row of long(gathering) stitches along the bottom line of Front-bust.

 Turn it inside out.
 Sew a two parallel row of long(gathering) stitches along the bottom line of Front-bust.11. To gather the Front-bust fabric simply hold the fabric still in one hand and pull one of the loose threads with the other.Do this on both sides until your Front bust is the same width as the each Front waist.
 12. Then pin the Front-bust to the Front waist, with right sides together. Sew them together along the Front bust lineand front line with a nice curve as shown.
 . Align the skirt and Front bodice right sides together. Pin all the way around waist line and sew as shown.Serge or do zigzag the raw edge.
 13. Align the skirt and Back bodice right sides together. Pin all the way around waist line and sew as shown.Serge or do zigzag the raw edge.
 Press center back seams open as shown.
 Mark the starting point of back.
 And mark the starting point of zipper too.
 Open up the zipper, rolling and pressing out the curled zipper teeth so they lay slightly flat. (This will help you get a closer stitch, resulting in a cleaner finish for the zipper.) Be sure to press with a low setting — too much heat can melt the teeth.

 Place the zipper coil right side down along one of the marked 3/8”(1cm) seam allowances and pin in place.
 Start at the top edge and stitch in place until 0.5cm(3/16") away from zipper stop.
 Sew the zipper to the other side of the pattern piece.
 Fold the rest of zipper and pin it as shown.
 Then Cut zipper out as shown.
 Flip the lining over from the neckline and pin down – sandwiching the invisible zipper between the main fabric and lining. RIGHT SIDES TOGETHER. Sew down the lining.
 Turn the bodice inside out
 Pin the patterns to the fabric and cut along the solid lines.


댓글
댓글 쓰기